Irresistible Butterfinger Candy Bar Poke Cake Recipe
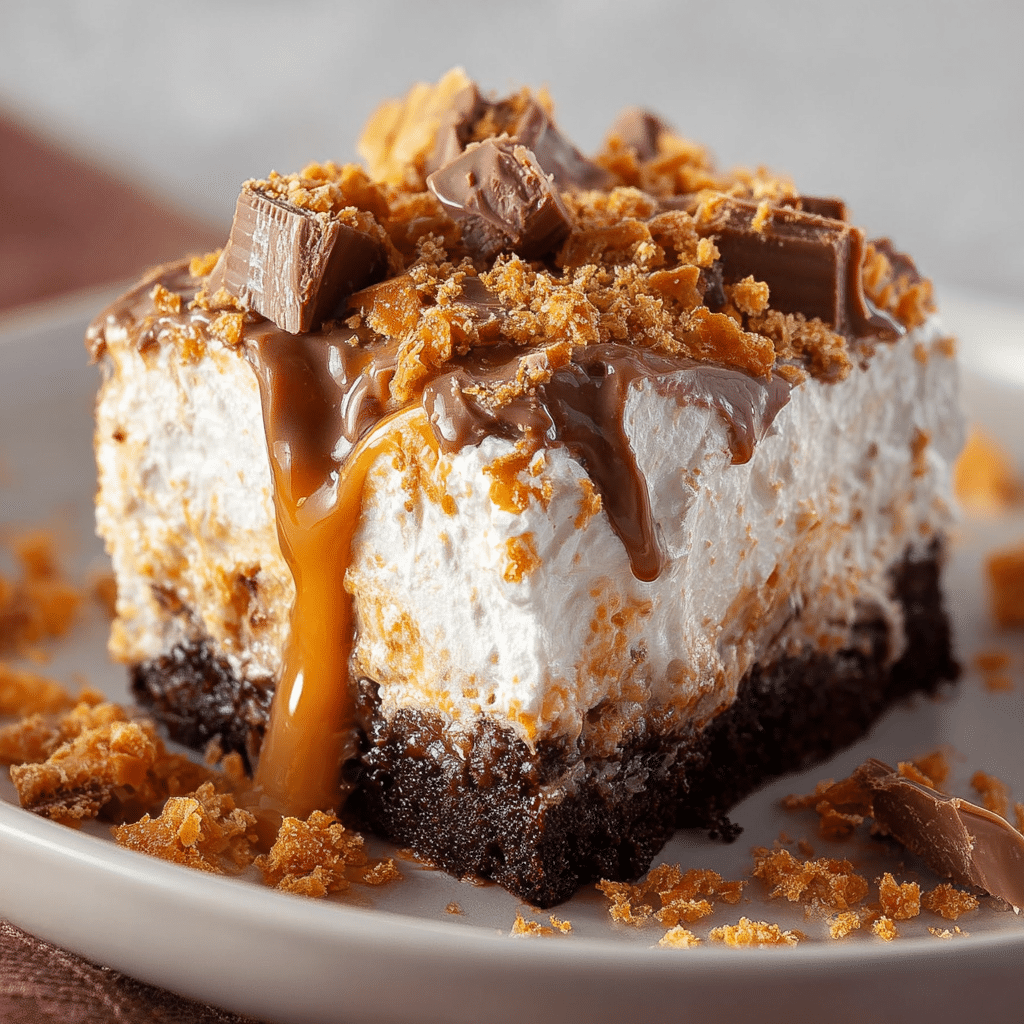
Looking for a dessert that combines chocolate, peanut butter, and a crave-worthy crunch? This Butterfinger Candy Bar Poke Cake is exactly what you need. Moist chocolate cake soaked with creamy fillings and loaded with chopped Butterfinger bars creates the ultimate flavor explosion that’s perfect for any celebration or just a sweet indulgence. Once you try this Butterfinger Candy Bar Poke Cake, it’ll quickly become your go-to recipe for impressing friends and family!
Why You’ll Love This Recipe
- Decadent Flavor Combination: Chocolate and peanut butter come together perfectly with the added crunch of Butterfinger for a satisfyingly rich dessert.
- Simple Step-by-Step Instructions: No complicated steps or rare ingredients make this recipe accessible for bakers of all levels.
- Family Favorite: This cake is loved by kids and adults alike, making it a reliable crowd-pleaser at any gathering.
- Versatile Serving Options: Whether served chilled or at room temperature, this cake tastes amazing every time.
- Easy to Customize: The recipe adapts easily with different toppings and mix-ins for new flavor twists.
Ingredients You’ll Need
Each ingredient in this Butterfinger Candy Bar Poke Cake plays a key role in creating a moist, creamy, and flavorful dessert. Using pantry staples combined with candy bars makes baking both simple and fun. Here’s everything you need to get started:
- Chocolate cake mix: A classic base that ensures moist and tender cake layers without extra fuss.
- Butterfinger candy bars: Chopped finely for a crunchy peanut butter and chocolate surprise throughout the cake.
- Sweetened condensed milk: Poured into the poke holes to infuse the cake with rich, creamy sweetness.
- Peanut butter frosting: Adds smooth, nutty layers that complement the Butterfinger pieces perfectly.
- Whipped cream topping: Lightens the cake creating a fluffy and airy contrast to the dense chocolate and peanut butter flavors.
Variations for Butterfinger Candy Bar Poke Cake
This recipe is wonderfully flexible, giving you the freedom to experiment with ingredients or accommodate dietary preferences. Whether you want to amp up the chocolate or swap flavors, these variations make it easy to tailor the cake to your taste.
- Double chocolate: Use chocolate fudge frosting instead of peanut butter for an intensely chocolatey experience.
- Nut-free option: Substitute Butterfinger bars with crushed crispy toffee bars to avoid nuts while maintaining crunch.
- Vegan version: Use dairy-free condensed milk and vegan chocolate cake mix for a plant-based treat.
- Salted caramel twist: Drizzle caramel sauce over the top along with a pinch of sea salt to add sweet and salty notes.
- Mini poke cakes: Bake in cupcake liners for portable, fun-size portions perfect for parties.

How to Make Butterfinger Candy Bar Poke Cake
Step 1: Bake the Chocolate Cake
Prepare the chocolate cake mix according to package instructions and bake it in a 9×13-inch pan until a toothpick comes out clean. Let the cake cool completely before moving to the next step.
Step 2: Poke Holes into the Cake
Use the handle of a wooden spoon or a similar tool to poke holes evenly all over the top of the cooled cake, about one inch apart. This helps the condensed milk soak in for maximum moistness.
Step 3: Pour Sweetened Condensed Milk
Slowly pour the sweetened condensed milk over the cake, allowing it to seep into all the holes. This step adds creamy sweetness and keeps the cake ultra moist.
Step 4: Layer with Peanut Butter Frosting
Spread a generous layer of peanut butter frosting over the cake, covering the entire surface and locking in all the gooey goodness beneath.
Step 5: Top with Chopped Butterfinger
Sprinkle finely chopped Butterfinger candy bars evenly over the frosting, so every bite includes that signature crispy crunch.
Step 6: Add Whipped Cream
Finish the cake with a fluffy layer of whipped cream or whipped topping for lightness and to balance the richness.
Pro Tips for Making Butterfinger Candy Bar Poke Cake
- Cool cake completely: Make sure the cake is fully cooled before poking holes to prevent crumbling.
- Use quality peanut butter frosting: A smooth and creamy frosting elevates the overall flavor experience.
- Chop Butterfinger finely: Smaller pieces distribute better and ensure crunchy bites throughout.
- Let it chill: Refrigerate the cake for at least 2 hours before serving to allow flavors to meld perfectly.
- Use a serrated knife: Slice gently with a serrated knife to keep servings neat and prevent squishing.
How to Serve Butterfinger Candy Bar Poke Cake
Garnishes
Top with additional chopped Butterfinger bars, a drizzle of melted chocolate, or a sprinkle of chopped peanuts for extra flair and texture.
Side Dishes
Serve alongside fresh berries or a scoop of vanilla ice cream to add a refreshing contrast to the rich, nutty flavors of the cake.
Creative Ways to Present
Serve the cake in individual clear cups layered with whipped cream and candy pieces, turning this classic poke cake into a striking dessert parfait perfect for celebrations.
Make Ahead and Storage
Storing Leftovers
Store leftover Butterfinger Candy Bar Poke Cake tightly covered in the refrigerator for up to 4 days to maintain freshness and texture.
Freezing
Wrap the cake securely with plastic wrap and foil, then freeze for up to 2 months. Thaw overnight in the fridge before serving.
Reheating
This cake is best enjoyed chilled but can be brought to room temperature before serving; avoid microwaving to maintain texture and creaminess.
FAQs
Can I use homemade chocolate cake instead of cake mix?
Absolutely! Homemade chocolate cake works beautifully in this recipe and adds a personal touch to your Butterfinger Candy Bar Poke Cake.
What is the best way to chop Butterfinger bars?
Use a sharp knife to finely chop the candy bars into small, bite-sized pieces for even distribution and easy eating.
Can I make this cake nut-free?
Yes, simply substitute Butterfinger bars with a nut-free candy bar like toffee or crispy wafer to keep the texture and crunch without nuts.
How long should I refrigerate the poke cake before serving?
Refrigerate for at least 2 hours to allow the condensed milk to soak in and the frosting to set for the best flavor and texture.
Is it possible to freeze this cake?
Yes, Butterfinger Candy Bar Poke Cake freezes well when wrapped properly and can be thawed gently in the refrigerator before enjoying.
Final Thoughts
If you love a dessert packed with chocolate, peanut butter, and an unforgettable crunch, this Butterfinger Candy Bar Poke Cake is made for you. Rich, creamy, and easy to prepare, it’s perfect for impressing guests or satisfying your sweet tooth whenever the craving hits. Give it a try—you might just discover your new favorite cake recipe!
Related Posts
- How to Make Easter Dirt Cake Dessert Fast
- How to Make Mini Easter Carrot Cakes Easily
- How to Make Easter Swirl Cheesecake Pie
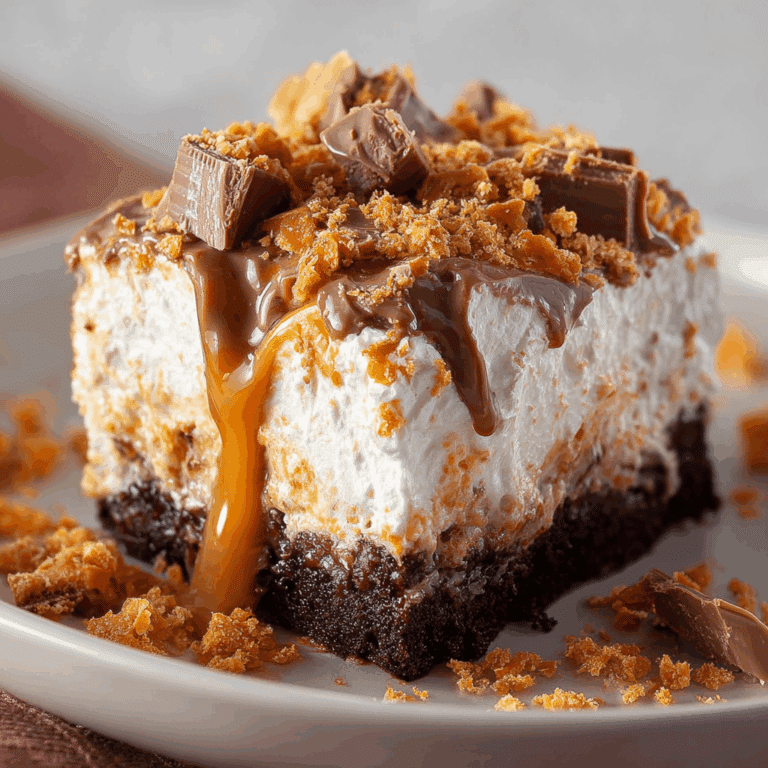
Butterfinger Candy Bar Poke Cake
Butterfinger Candy Bar Poke Cake is a decadent dessert combining moist chocolate cake, creamy peanut butter frosting, and crunchy chopped Butterfinger bars. This rich and flavorful poke cake is soaked with sweetened condensed milk to keep it ultra moist, topped with whipped cream for a light finish, and perfect for celebrations or sweet indulgence. Easy to make and loved by both kids and adults, this recipe is a crowd-pleaser with versatile serving and customization options.
- Total Time: 2 hours 50 minutes
- Yield: 12 servings 1x
Ingredients
Cake Base
- 1 box chocolate cake mix
Fillings and Toppings
- 1 (14 oz) can sweetened condensed milk
- 1 cup peanut butter frosting
- 1 cup chopped Butterfinger candy bars (finely chopped)
- 1 cup whipped cream or whipped topping
Instructions
- Bake the Chocolate Cake: Prepare the chocolate cake mix according to the package instructions and bake it in a 9×13-inch pan until a toothpick inserted in the center comes out clean. Let the cake cool completely before moving on to the next step.
- Poke Holes into the Cake: Use the handle of a wooden spoon or a similar tool to poke holes evenly all over the top of the cooled cake, spacing them about one inch apart. This allows the sweetened condensed milk to soak in for maximum moistness.
- Pour Sweetened Condensed Milk: Slowly pour the sweetened condensed milk over the cake, letting it seep into all the holes and infuse the cake with creamy sweetness.
- Layer with Peanut Butter Frosting: Spread a generous layer of peanut butter frosting evenly over the entire surface of the cake, locking in all the gooey sweetness below.
- Top with Chopped Butterfinger: Sprinkle the finely chopped Butterfinger candy bars evenly over the peanut butter frosting to add a signature crunchy texture to each bite.
- Add Whipped Cream: Finish by spreading a fluffy layer of whipped cream or whipped topping over the cake for a light and airy balance to the richness.
Notes
- Cool cake completely before poking holes to prevent crumbling.
- Use a smooth and creamy peanut butter frosting to enhance flavor and texture.
- Finely chop Butterfinger bars to evenly distribute crunchy bites throughout the cake.
- Refrigerate the cake for at least 2 hours before serving to allow flavors to meld.
- Smoothly slice with a serrated knife to keep servings neat and intact.
- Prep Time: 15 minutes
- Cook Time: 35 minutes
- Category: Dessert
- Method: Baking
- Cuisine: American
- Diet: Contains nuts
Nutrition
- Serving Size: 1 slice (1/12 of cake)
- Calories: 410
- Sugar: 35g
- Sodium: 220mg
- Fat: 22g
- Saturated Fat: 8g
- Unsaturated Fat: 10g
- Trans Fat: 0.5g
- Carbohydrates: 45g
- Fiber: 2g
- Protein: 5g
- Cholesterol: 35mg
Keywords: Butterfinger Cake, Poke Cake, Chocolate Peanut Butter Dessert, Candy Bar Cake, Easy Dessert Recipe

