Easy No-Bake Banana Split Cake Recipe to Try
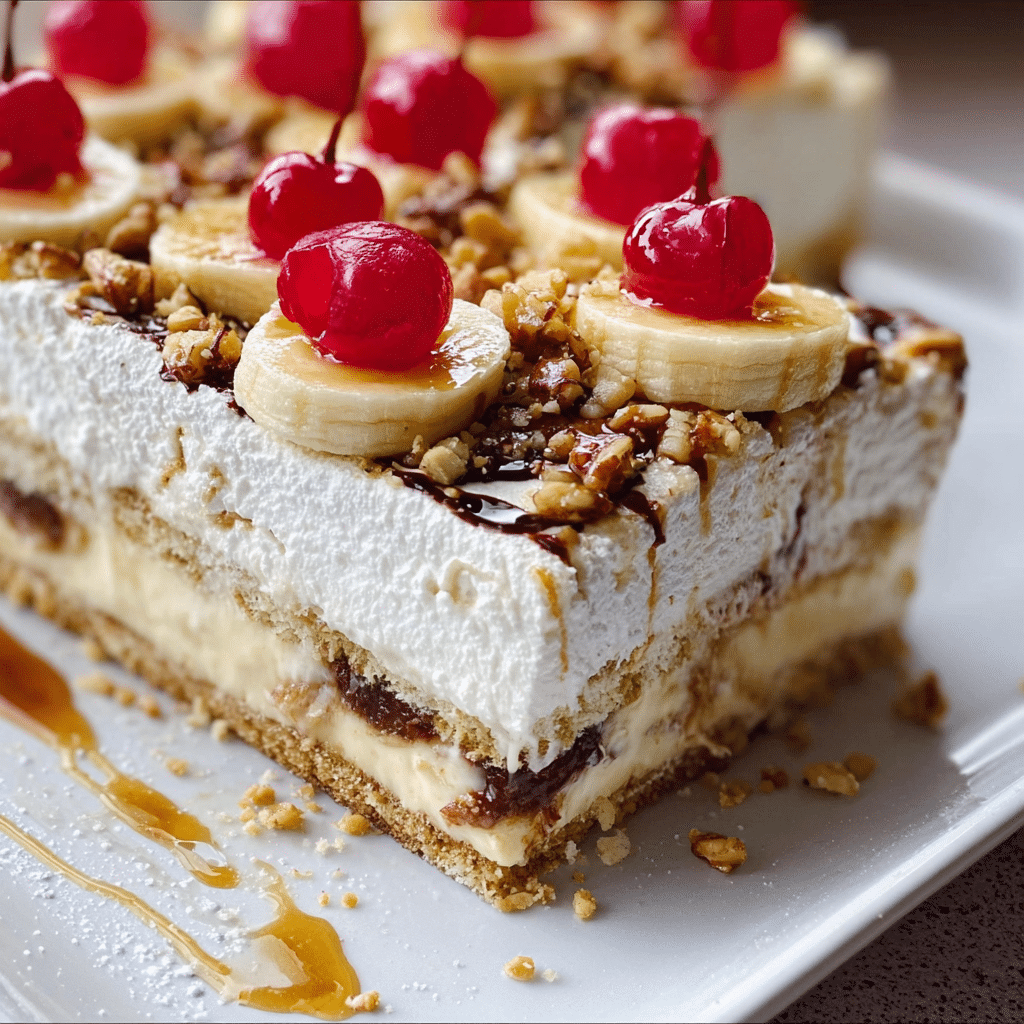
Nothing beats the charm of a No-Bake Banana Split Cake when you want a dessert that feels indulgent yet effortless. This delicious and simple dessert brings together creamy layers, fresh fruity flavors, and just the right touch of sweetness—all without needing an oven. Perfect for quick treats or impressing guests, this cake combines classic banana split ingredients into a delightful, creamy cake ready in minutes.
Why You’ll Love This Recipe
- Speedy Preparation: No oven or baking skills required, making it ideal for busy days or last-minute cravings.
- Refreshing Flavors: Combines the best of banana, strawberry, pineapple, and cream in every bite.
- Family-Friendly: Loved by kids and adults alike, it’s a crowd-pleaser for any occasion.
- Customizable Layers: Easily swap toppings or fruits to suit your preferences or dietary needs.
- Perfect Texture: Creamy filling balanced with light, crumbly crusts creates the ultimate mouthfeel.
Ingredients You’ll Need
This No-Bake Banana Split Cake uses simple staples that come together beautifully. Each ingredient plays a key role—from fresh bananas for natural sweetness to whipped cream for luscious texture and crushed cookies for a satisfying crunch.
- Ripe Bananas: Choose sweet and slightly firm bananas for the best flavor and structure.
- Strawberry Topping: Fresh or canned strawberries add vibrant color and a tart punch.
- Pineapple Chunks: Canned pineapple brings a juicy tropical twist to every forkful.
- Whipped Cream: Provides silkiness and lightness that balances the fruit’s acidity.
- Crushed Vanilla Wafers or Graham Crackers: Creates a crumbly, buttery base and layers for contrast.
- Vanilla Pudding Mix: Adds creamy richness and helps set the filling for perfect slices.
- Cherries: Classic maraschino cherries top the cake for that traditional banana split look.
Variations for No-Bake Banana Split Cake
Feel free to tweak this recipe based on the ingredients you have or the flavors you love. It’s surprisingly versatile and easy to personalize to dietary needs or taste preferences.
- Non-Dairy Version: Use coconut whipped cream and dairy-free pudding for a vegan-friendly treat.
- Chocolate Lovers’ Twist: Add a chocolate drizzle or use chocolate cookie crumbs in the crust for extra indulgence.
- Tropical Flair: Incorporate mango or kiwi slices for an exotic touch.
- Nuts and Crunch: Sprinkle chopped toasted pecans or walnuts between layers for added texture.
- Sweetener Swap: Use honey or maple syrup in the whipped cream for a natural sweetener alternative.

How to Make No-Bake Banana Split Cake
Step 1: Prepare the Crust
Start by crushing your vanilla wafers or graham crackers into fine crumbs. Combine them with melted butter and press the mixture evenly into the base of a 9×13 inch pan or a springform pan to form a firm crust. Refrigerate while you make the filling.
Step 2: Mix the Pudding Filling
In a bowl, whisk together the vanilla pudding mix with cold milk until thickened. Fold in whipped cream gently to create a fluffy, creamy filling. This combination gives the cake its smooth consistency and rich flavor.
Step 3: Layer the Bananas and Fruit
Slice ripe bananas and spread them evenly over the chilled crust. Next, add a layer of pineapple chunks and spoon a generous amount of strawberry topping over the bananas. These layers build the signature fruity foundation of the cake.
Step 4: Add the Creamy Pudding Mixture
Spread the pudding and whipped cream blend carefully over the fruit layers, smoothing it out evenly. This layer binds the ingredients together and adds creaminess.
Step 5: Chill to Set
Cover the cake lightly with plastic wrap and refrigerate for at least 4 hours, preferably overnight. This rest time allows the flavors to meld and the cake to set firmly, making it easier to slice.
Step 6: Garnish and Serve
Before serving, top with maraschino cherries and more crushed cookies for decoration and extra crunch. Slice generously and enjoy the cool, fruity indulgence!
Pro Tips for Making No-Bake Banana Split Cake
- Fresh Fruit Matters: Use the ripest bananas and freshest fruit to ensure maximum flavor and prevent browning.
- Chill Time: Don’t skip the refrigerating step, as it’s crucial for the cake’s texture and sliceability.
- Gentle Folding: When combining whipped cream with pudding, fold gently to keep the mixture light and airy.
- Crust Pressing: Press the crust firmly into the pan to avoid crumbling when slicing.
- Serving Tips: Use a sharp knife dipped in warm water to get clean cuts without smudging layers.
How to Serve No-Bake Banana Split Cake
Garnishes
Enhance the presentation by adding a sprinkle of crushed nuts, extra whipped cream dollops, or colorful maraschino cherries on top. Fresh mint leaves add a lovely pop of green and a refreshing aroma.
Side Dishes
Serve your cake alongside a scoop of vanilla ice cream or a drizzle of chocolate syrup for extra sweetness. A light fruit salad can complement the flavors and keep the dessert refreshing.
Creative Ways to Present
Try serving the cake in individual clear cups for a pretty layered look at parties. You can also assemble it as a trifle, layering cookies, fruit, and cream in a glass bowl for a stunning visual effect.
Make Ahead and Storage
Storing Leftovers
Keep your No-Bake Banana Split Cake covered tightly in the refrigerator for up to 3 days. This helps maintain moisture and prevents the banana slices from browning too quickly.
Freezing
While not ideal to freeze whole because of the fresh fruit, you can freeze small individual portions wrapped well in plastic wrap and foil for up to one month. Thaw them slowly in the fridge before serving.
Reheating
Since this is a no-bake, chilled dessert, reheating is not recommended. Serve it cold for the best texture and refreshing flavor experience.
FAQs
Can I make the No-Bake Banana Split Cake ahead of time?
Absolutely! It actually tastes better after sitting overnight as the flavors meld and the texture firms up nicely.
Is this cake suitable for freeze-freezing?
You can freeze portions of the cake but keep in mind that fresh fruit texture might change after thawing, so it’s best enjoyed fresh.
Can I use sugar-free pudding mix?
Yes, sugar-free or low-sugar pudding mixes work well if you want to reduce the sweetness while keeping the creamy consistency.
What’s the best substitute for whipped cream?
You can use whipped coconut cream for a dairy-free or vegan alternative that still delivers rich creaminess.
How long does the cake stay fresh in the fridge?
Store it covered in the refrigerator and enjoy within 3 days for optimal freshness and flavor.
Final Thoughts
If you’re craving a dessert that’s both fun and fuss-free, this No-Bake Banana Split Cake is your perfect match. Its creamy layers, fresh fruit, and quick prep time make it a winning recipe for any occasion. Give it a try, and you’ll likely find it becoming a go-to favorite for dessert nights.
Related Posts
- Why High Protein Cheesecake Fluff Is a Must-Try
- How to Make Lemon Curd Crème Brûlée Cookies
- Easy Protein Oreo Fluff Dessert Recipe

No-Bake Banana Split Cake
A delightful and effortless No-Bake Banana Split Cake featuring creamy layers, fresh fruits like bananas, strawberries, and pineapple, balanced with whipped cream and a crunchy cookie crust. Perfect for quick treats, family-friendly occasions, and customizable to suit dietary preferences.
- Total Time: 4 hours 20 minutes (including chill time)
- Yield: 12 servings 1x
Ingredients
Fruit Layers
- 3–4 ripe bananas, sliced
- 1 cup strawberry topping (fresh or canned)
- 1 cup canned pineapple chunks, drained
- Maraschino cherries, for garnish
Crust
- 2 cups crushed vanilla wafers or graham crackers
- 1/2 cup melted butter
Filling
- 1 package (3.4 oz) vanilla pudding mix
- 2 cups cold milk
- 1 cup whipped cream
Instructions
- Prepare the Crust: Crush vanilla wafers or graham crackers into fine crumbs, combine with melted butter, and press evenly into the base of a 9×13 inch pan or springform pan to form a firm crust. Refrigerate while preparing the filling.
- Mix the Pudding Filling: Whisk vanilla pudding mix with cold milk until thickened, then gently fold in whipped cream to create a fluffy, creamy filling.
- Layer the Bananas and Fruit: Evenly spread sliced bananas over the chilled crust, add a layer of pineapple chunks, then spoon strawberry topping over the bananas.
- Add the Creamy Pudding Mixture: Spread the pudding and whipped cream blend carefully over the fruit layers, smoothing it out evenly to bind the ingredients together.
- Chill to Set: Cover lightly with plastic wrap and refrigerate for at least 4 hours or preferably overnight to allow flavors to meld and the cake to set firmly.
- Garnish and Serve: Before serving, top with maraschino cherries and additional crushed cookies for decoration and extra crunch. Slice and enjoy chilled.
Notes
- Use the ripest bananas and freshest fruit to maximize flavor and prevent browning.
- Do not skip the refrigerating step as it is crucial for texture and sliceability.
- Fold whipped cream gently into the pudding mixture to maintain light and airy consistency.
- Press the crust firmly into the pan to prevent crumbling when slicing.
- Use a sharp knife dipped in warm water for clean cuts without smudging layers.
- Prep Time: 20 minutes
- Cook Time: 0 minutes
- Category: Dessert
- Method: No-Bake
- Cuisine: American
- Diet: Vegetarian
Nutrition
- Serving Size: 1 slice (1/12th of cake)
- Calories: 280
- Sugar: 22g
- Sodium: 150mg
- Fat: 12g
- Saturated Fat: 7g
- Unsaturated Fat: 3g
- Trans Fat: 0g
- Carbohydrates: 35g
- Fiber: 2g
- Protein: 3g
- Cholesterol: 30mg
Keywords: no-bake, banana split, dessert, cake, easy, creamy, fruit, family-friendly, summer dessert