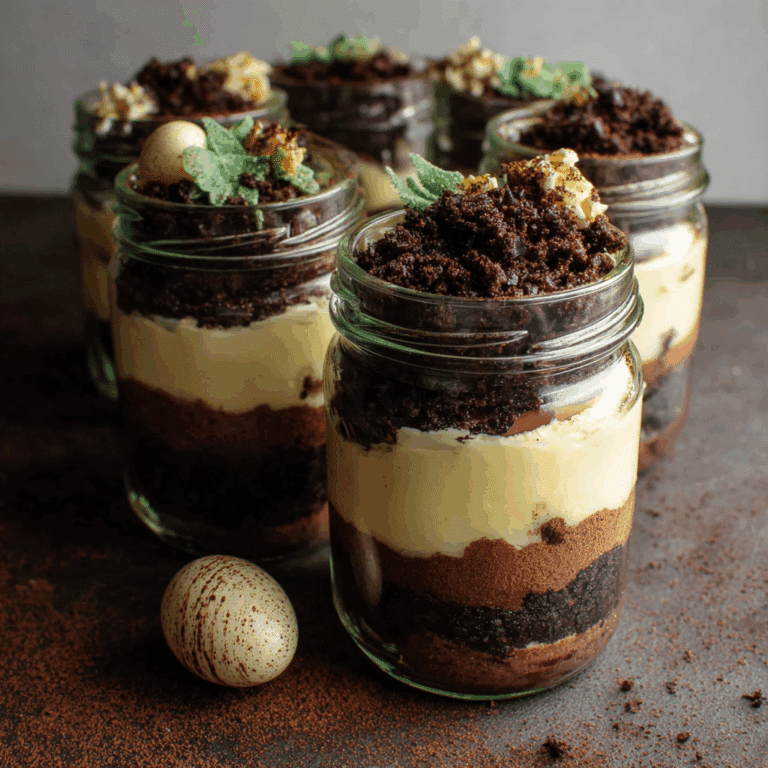
Easy Easter Dirt Pudding Jars for Kids

If you’re looking for a delightful and simple springtime treat, these Easter Dirt Pudding Jars are a guaranteed hit with kids and adults alike. Combining creamy pudding, crunchy cookie “dirt,” and colorful candy “worms,” this no-bake dessert is the perfect way to celebrate Easter and enjoy family fun. Easy to assemble and fun to personalize, these jars deliver tasty layers that bring smiles with every bite!
Why You’ll Love This Recipe
- Simple Prep: Requires no baking, making it quick and stress-free for busy families.
- Kid-Friendly Fun: Let kids help layer and decorate for a hands-on treat-making experience.
- Festive and Colorful: Bright candy add-ins make the jars perfect for Easter and spring celebrations.
- Portable and Perfect for Parties: Individual jars are easy to transport and serve at gatherings.
- Customizable: You can tweak ingredients for dietary needs or taste preferences effortlessly.
Ingredients You’ll Need
Gathering simple pantry staples and a few sweet extras will have you ready to assemble these charming Easter Dirt Pudding Jars in no time. Each ingredient adds something special—from rich creaminess to a sandy, crunchy texture and playful pops of color.
- Instant Pudding Mix: Choose vanilla or chocolate for creamy, smooth layers that act as the base flavor.
- Milk: Essential for mixing the pudding to the perfect consistency; use whole or any milk of choice.
- Crushed Chocolate Sandwich Cookies: Create the “dirt” topping with Oreo or any chocolate cookie to add crunch and color.
- Gummy Worm Candies: Bright and fun, these add a whimsical Easter touch to the jars.
- Whipped Cream: Optional topping for an extra fluffy, light finish that kids adore.
- Mini Mason Jars or Clear Cups: For serving, creating layers that showcase the dirt pudding beautifully.
Variations for Easter Dirt Pudding Jars
This recipe is wonderfully flexible, so don’t hesitate to put your own spin on it. Whether swapping out ingredients for allergies, experimenting with flavors, or changing up the decorations, these adorable jars welcome creativity and taste fun.
- Chocolate Lovers’ Twist: Use chocolate pudding and chocolate cookie crumbs for a rich, indulgent jar.
- Dairy-Free Version: Swap regular milk for almond, oat, or coconut milk and use non-dairy whipped topping.
- Fruit-Infused: Add a layer of mashed strawberries, bananas, or blueberries for a fresh and colorful surprise.
- Healthy Option: Use Greek yogurt mixed with a bit of honey instead of pudding for a tangy and protein-packed treat.
- Candy-Free Version: Replace gummy worms with fresh fruit slices or edible flowers for an Easter-safe option.

How to Make Easter Dirt Pudding Jars
Step 1: Prepare the Pudding
Mix the instant pudding mix with cold milk according to package instructions, whisking until thickened and creamy. Let it set in the fridge for a few minutes to firm up while you prepare other ingredients.
Step 2: Crush the Cookies
Place the chocolate sandwich cookies in a sealed bag and crush with a rolling pin or use a food processor to create fine crumbs that mimic dirt texture, keeping some slightly larger pieces for added crunch.
Step 3: Assemble the Layers
Start with a layer of pudding at the bottom of each jar or cup, followed by a generous sprinkle of cookie crumbs. Repeat layers until jars are almost full, finishing with a top layer of cookie “dirt.”
Step 4: Add the Worms and Whipped Cream
Tuck gummy worms partially into the top cookie layer for a playful look. Optionally, pipe or dollop whipped cream over the dirt to create a fluffier top and garnish further with candy decoration.
Step 5: Chill Before Serving
Place the jars in the refrigerator for at least 30 minutes to allow flavors to meld and pudding to firm up for the best texture and taste.
Pro Tips for Making Easter Dirt Pudding Jars
- Cookie Crunch: For extra texture contrast, mix in a handful of chocolate chips along with crushed cookies.
- Layer Evenly: Use a spoon or small spatula to smooth each pudding layer for a neat presentation.
- Gummy Worm Placement: Slightly bury worms into the dirt so they look like they’re crawling, adding to the fun visual appeal.
- Chill Time: Don’t skip the chilling step; it helps the pudding firm up for clean layers and richer flavor.
- Jar Size: Mini jars (about 8 oz) are perfect for portion control and make for adorable, single-serve treats.
How to Serve Easter Dirt Pudding Jars
Garnishes
Top your jars with a swirl of whipped cream and a few extra gummy worms or pastel-colored sprinkles for an Easter-ready look that kids will be excited to dig into.
Side Dishes
These sweet pudding jars pair nicely with fresh fruit platters or light sandwiches, balancing dessert with some healthy and savory options for a complete spring snack spread.
Creative Ways to Present
Try layering different flavored puddings or using colorful clear jars to highlight the layered textures. Decorating jar lids with ribbons, Easter tags, or bunny-themed toppers adds personality and makes them gift-worthy.
Make Ahead and Storage
Storing Leftovers
Keep leftover Easter Dirt Pudding Jars covered tightly in the refrigerator for up to 2 days to maintain freshness and avoid drying out the “dirt” topping.
Freezing
Freezing is not recommended as pudding texture changes and cookies lose their crunch, but if necessary, layer the ingredients separately and assemble just before serving.
Reheating
Since this is a chilled no-bake dessert, reheating is not advised; serve straight from the fridge for optimum taste and texture.
FAQs
Can I make Easter Dirt Pudding Jars without gelatin?
Yes! Most instant pudding mixes are already gelatin-free, so if you choose one without gelatin, your jars will work perfectly for those avoiding it.
What age is this recipe suitable for?
These jars are safe and fun for almost any age; however, children under three should be supervised due to small candy pieces like gummy worms.
Can I use homemade pudding instead of instant mix?
Absolutely! Homemade pudding will give a richer flavor; just ensure it’s thick enough to hold layers and chill thoroughly before assembling.
How long can I prepare Easter Dirt Pudding Jars ahead?
You can assemble them up to a day in advance and store in the fridge, but it’s best to add gummy worms and whipped cream just before serving to keep them fresh.
Are there alternative “worm” options for allergies?
Yes, fresh fruit strips, licorice, or edible flower petals can replace gummy worms to accommodate preferences and allergies without compromising on fun.
Final Thoughts
These Easter Dirt Pudding Jars are an easy, charming way to bring joy to your Easter table and family celebrations. With minimal ingredients and fuss, they offer a hands-on activity for kids and a sweet treat everyone will adore. So gather your jars, cookies, and candy worms—then get ready to enjoy a tasty, playful springtime dessert together!
Related Posts
- Why Strawberry Lemon Cake Is Perfect For Summer
- Irresistible Tiramisu Cupcakes to Try Now
- Easy Strawberry Shortcake Trifles Recipe to Try
Easter Dirt Pudding Jars
Easter Dirt Pudding Jars are a delightful no-bake dessert combining creamy pudding, crunchy chocolate cookie crumbs, and colorful gummy worms, perfect for spring and Easter celebrations. Easy to prepare and kid-friendly, these jars layer pudding and cookie ‘dirt’ in individual containers, topped with whimsical candy worms and optional whipped cream. Portable, customizable, and fun to make, they bring festive joy and tasty layers in every bite.
- Total Time: 40 minutes
- Yield: 6 servings 1x
Ingredients
Pudding Base
- 1 package Instant Pudding Mix (vanilla or chocolate, about 3.4 oz)
- 2 cups Milk (whole or any preferred type)
Dirt Topping
- 15–20 Chocolate Sandwich Cookies (Oreo or similar), crushed
Decorations
- Gummy Worm Candies (about 15-20 worms)
- Whipped Cream (optional, for topping)
Serving
- Mini Mason Jars or Clear Cups (8 oz size recommended)
Instructions
- Prepare the Pudding: Mix the instant pudding mix with cold milk according to package instructions, whisking until thickened and creamy. Let it set in the refrigerator for a few minutes to firm up while you prepare other ingredients.
- Crush the Cookies: Place the chocolate sandwich cookies in a sealed bag and crush them with a rolling pin or pulse in a food processor until you have fine crumbs and some slightly larger pieces for texture.
- Assemble the Layers: Start by spooning a layer of pudding into the bottom of each jar or cup. Follow with a generous sprinkle of crushed cookie crumbs. Repeat layering pudding and cookie crumbs until the jars are almost full, finishing with a top layer of cookie “dirt.”
- Add the Worms and Whipped Cream: Tuck gummy worms partially into the top cookie layer to create a playful look. Optionally, pipe or dollop whipped cream on top for a fluffy finish and garnish further with candy decorations if desired.
- Chill Before Serving: Refrigerate the assembled jars for at least 30 minutes to allow the pudding to firm up and flavors to meld for the best taste and texture.
Notes
- For extra texture, mix in a handful of chocolate chips with the crushed cookies.
- Use a spoon or small spatula to smooth pudding layers for a neat presentation.
- Slightly bury gummy worms into the cookie crumbs to make them appear as if they are crawling.
- Chilling is essential to firm up pudding and create clean layers.
- Use 8 oz mini jars for perfect portion control and cute presentation.
- Prep Time: 10 minutes
- Cook Time: 0 minutes
- Category: Dessert
- Method: No-Bake
- Cuisine: American
- Diet: Can be made Gluten Free with gluten-free cookies
Nutrition
- Serving Size: 1 jar (approximately 8 oz)
- Calories: 300
- Sugar: 25g
- Sodium: 150mg
- Fat: 12g
- Saturated Fat: 7g
- Unsaturated Fat: 3g
- Trans Fat: 0g
- Carbohydrates: 42g
- Fiber: 1g
- Protein: 4g
- Cholesterol: 25mg
Keywords: Easter dessert, pudding jars, no-bake dessert, kids dessert, spring treat, layered pudding, Easter candy