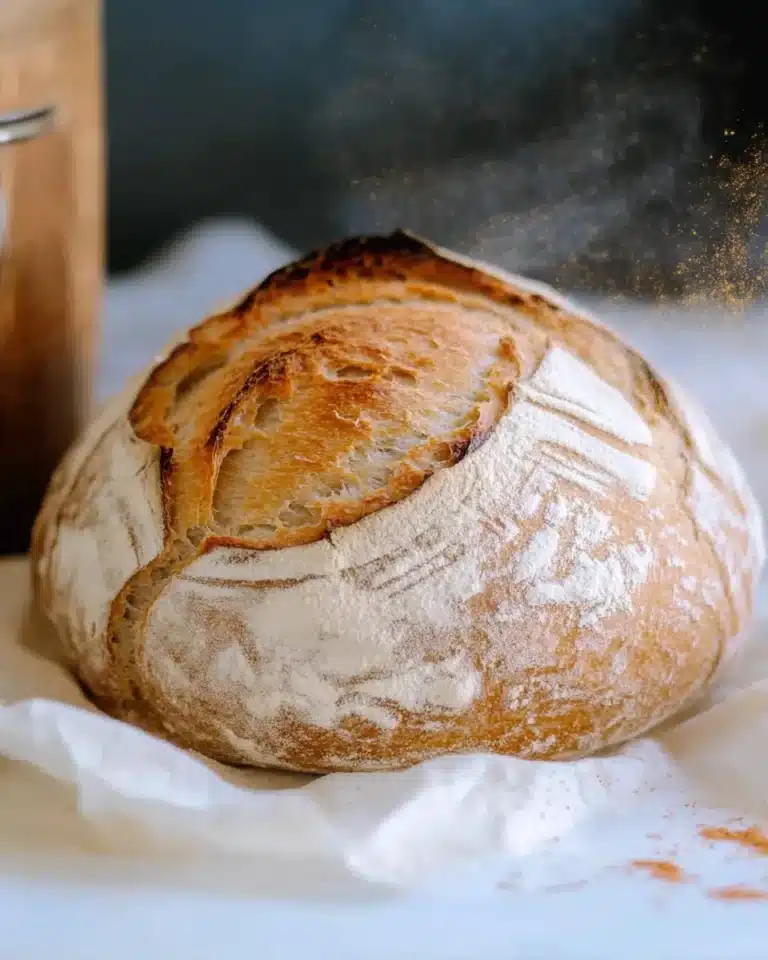
Best No Knead Artisan Bread Recipe – Easy & Delicious
There’s something magical about the aroma of freshly baked bread wafting through your home, and the Best No Knead Artisan Bread Recipe makes that dream accessible to everyone, regardless of baking experience. This simple yet rewarding method eliminates the labor of traditional kneading, allowing you to create a crusty loaf with a tender, airy interior with minimal effort. Perfect for those cozy evenings or impressive gatherings, this recipe opens a world of possibilities, inviting experimentation with various flours, add-ins like herbs and cheese, or even sweet variations with fruits and nuts.
What sets this recipe apart is its flexibility, encouraging you to tailor the loaf to your taste while still achieving that artisanal finish. For optimal results, don’t rush the fermentation process—allowing the dough to rest enhances flavor and texture. Whether you’re a seasoned baker or a curious novice, this bread will undoubtedly elevate your culinary repertoire. Get ready to impress yourself and your guests with a stunning loaf that speaks volumes about the love and care invested in its creation!
Ingredients for Best No Knead Artisan Bread Recipe:
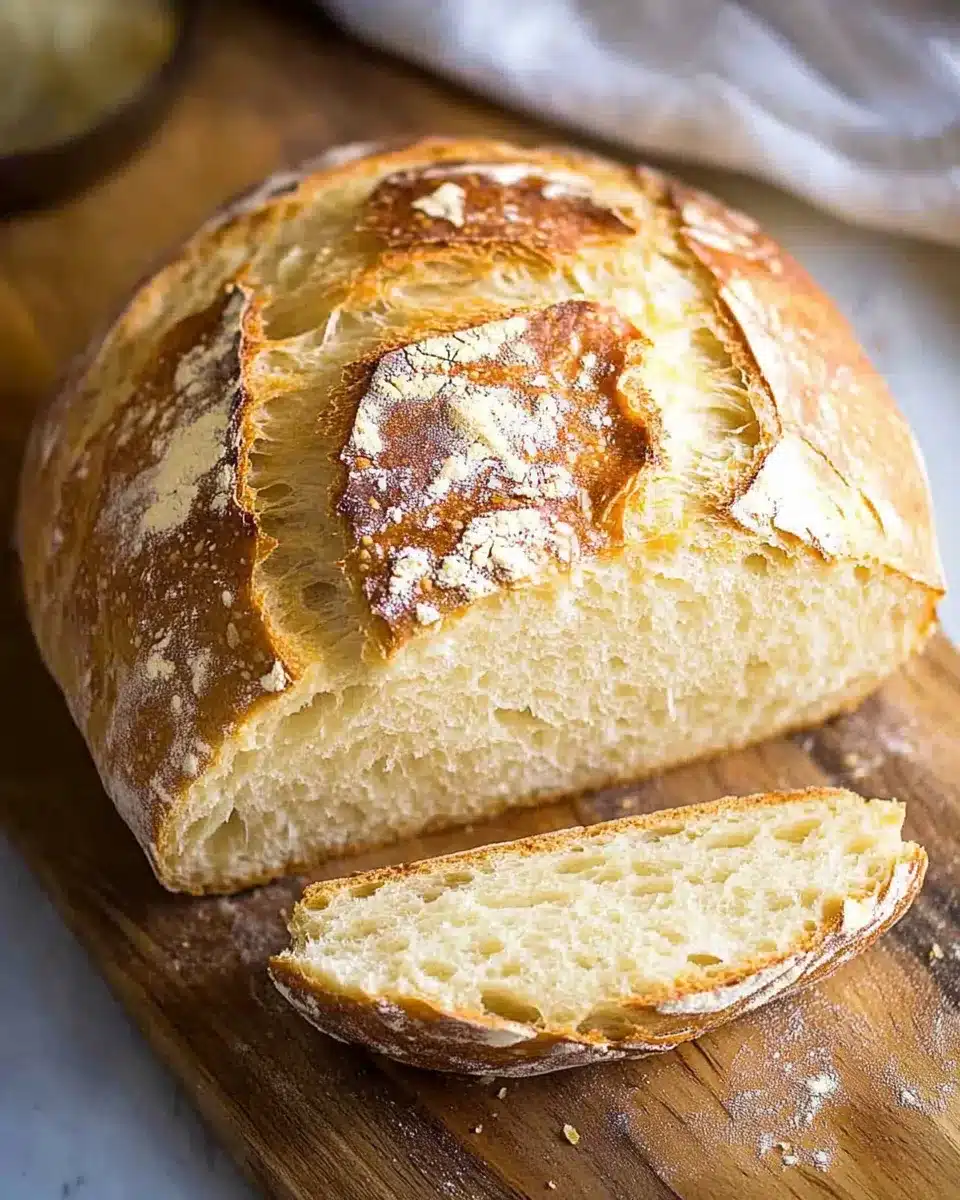
This simple but delightful artisan bread recipe offers a hassle-free way to enjoy freshly baked bread at home. With minimal ingredients and no kneading required, you can achieve a beautifully crusty loaf with a soft, airy interior. Below are the detailed ingredients you’ll need to make a loaf that serves 8–10 people.
Basic Ingredients:
- 3 cups (360g) all-purpose flour – Use unbleached all-purpose flour for the best results. You can also substitute whole wheat flour for a nuttier flavor.
- 1 ½ teaspoons (7g) salt – Regular table salt works well, but sea salt can add a lovely depth of flavor.
- ½ teaspoon (1.5g) instant yeast – Instant yeast is preferred for its quick activation. If using active dry yeast, be sure to proof it in warm water first.
- 1 ½ cups (360ml) warm water – The water should be around 110°F (43°C) to activate the yeast properly without killing it.
Optional Enhancements:
- ¼ cup (30g) cornmeal or flour – For dusting the baking surface to prevent sticking. This adds texture to the bottom crust.
- 2 tablespoons (30ml) olive oil – Incorporate this for a richer flavor and softer crust. You can also consider using herb-infused oils.
- Herbs and spices – Add 1-2 teaspoons of dried herbs (like rosemary or thyme) for flavor variations.
- Cheese – Incorporate 1 cup (100g) shredded cheese (such as cheddar or feta) into the dough for a cheesy twist.
Flavor Variations:
- Garlic – Mix in 2 cloves of minced garlic for a savory taste.
- Nuts and Seeds – Add ½ cup (75g) of walnuts or sunflower seeds for added texture and nutrients.
- Dried fruits – Incorporate ½ cup (75g) of raisins or dried cranberries for a touch of sweetness.
These ingredients will combine effortlessly in your mixing bowl, allowing you to take the time to appreciate the beautiful craft of bread making without the usual labor of kneading. Enjoy your baking journey with this straightforward approach!
How to prepare Best No Knead Artisan Bread Recipe:
This no knead artisan bread is easy to make and requires minimal effort. Follow these step-by-step instructions to achieve delicious homemade bread.
Step 1: Gather Your Ingredients
Start by collecting all necessary ingredients. You will need 3 cups of all-purpose flour, 1 teaspoon of salt, 1/2 teaspoon of instant yeast, and 1 1/2 cups of warm water. Make sure everything is fresh for the best results.
Step 2: Mix the Dry Ingredients
In a large mixing bowl, add the flour, salt, and instant yeast together. Use a whisk to combine the elements evenly. This helps distribute the yeast uniformly throughout the mixture.
Step 3: Add the Water
Pour the warm water into the dry ingredient mixture. Make sure the water is not too hot, as it can kill the yeast. Use a spatula to stir the ingredients until they form a shaggy dough. Ensure all the flour is incorporated.
Step 4: First Rise
Cover the mixing bowl with plastic wrap or a clean kitchen towel. Allow the dough to rise at room temperature for 12 to 18 hours. This long resting time lets the dough develop flavor and texture.
Step 5: Preparing for Baking
After the first rise, sprinkle some flour on a clean countertop. Use a rubber spatula to gently transfer the risen dough onto the floured surface. Be careful not to deflate the dough too much during this process.
Step 6: Shape the Dough
With floured hands, shape the dough into a ball. Lightly fold the edges of the dough toward the center, rotating as you go. This forms a neat shape without excessive handling.
Step 7: Second Rise
Place the shaped dough seam side down in a floured proofing basket or bowl. Cover it again with the cloth and let it rise for another 1 to 2 hours. Preheat your oven to 450°F (232°C) during the last 30 minutes of this rise.
Step 8: Bake the Bread
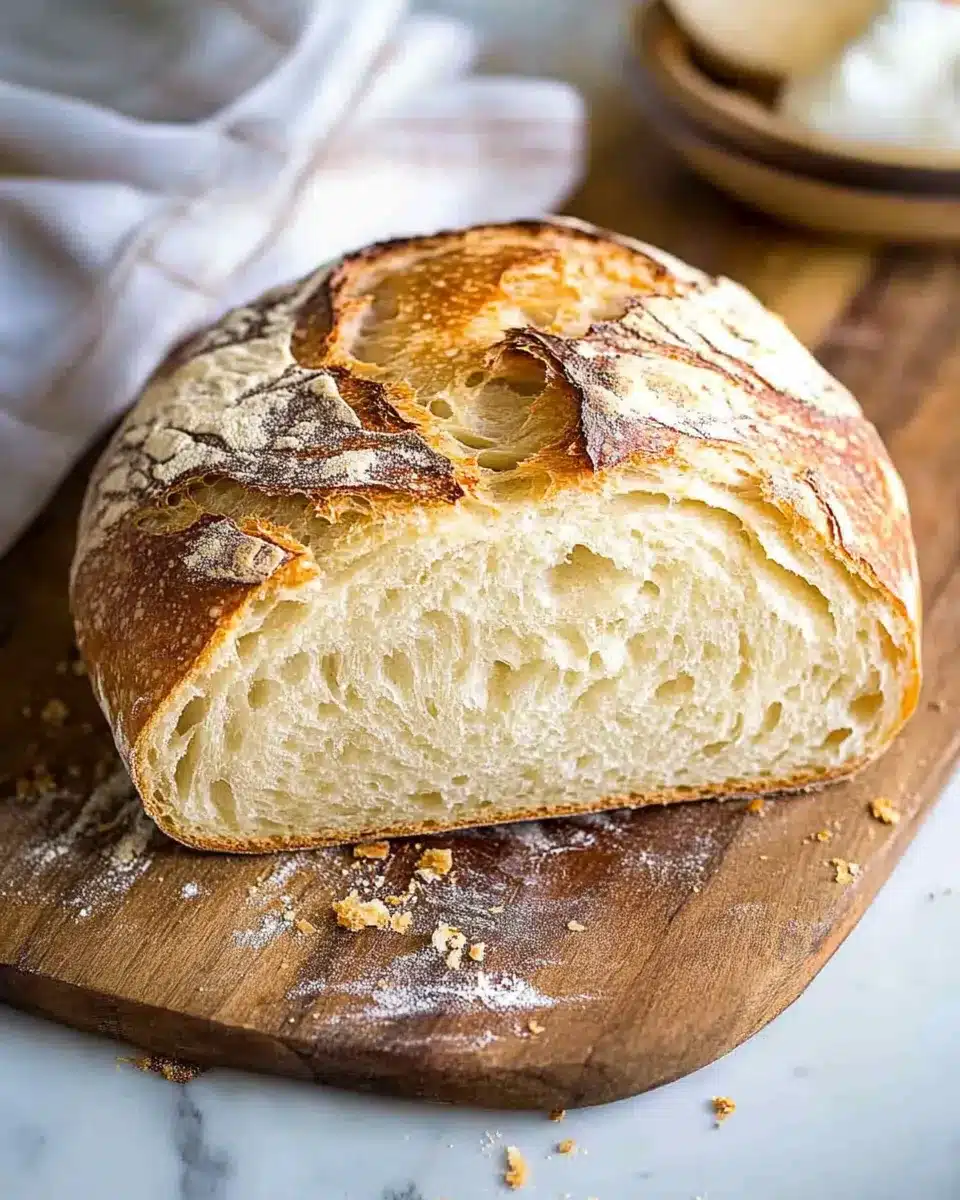
Once the dough has risen, carefully transfer it to a preheated Dutch oven. Cover with the lid and bake for 30 minutes. Then remove the lid and bake for an additional 15-20 minutes to achieve a golden crust.
Step 9: Cool and Enjoy
Remove the bread from the oven and let it cool on a wire rack for at least 30 minutes. This step is crucial for the texture. Slice and serve your delicious homemade loaf! Enjoy the fruits of your labor!
Tips for the Perfect Best No Knead Artisan Bread Recipe
Maintain the Right Temperature
Maintaining the correct temperature during the bread-making process is crucial. Aim for a warm environment for your dough. Ideal temperatures for proofing should range between 70°F to 80°F (21°C to 27°C). If your kitchen is too cold, consider placing the dough in a slightly warmed oven that you turn off immediately after warming for just a few minutes. Alternatively, you can use a heating pad under the bowl on a low setting to keep your dough cozy.
Use Quality Ingredients
The quality of ingredients directly impacts the flavor and texture of your bread. Start with high-quality all-purpose flour or bread flour for the best results. Fresh yeast is preferred; if using dry yeast, check its expiration date to ensure it’s still active. Always use filtered water since chlorine can inhibit yeast activity. Additionally, consider adding a pinch of sugar when activating your yeast to give it an initial boost.
Consider Dietary Substitutions
This no-knead recipe is quite flexible. For those needing gluten-free options, replace wheat flour with a gluten-free blend. Be mindful that different blends absorb moisture differently, so you may need to adjust the liquid content slightly. You can substitute dairy products as well: for a vegan version, replace dairy with plant-based milk or yogurt. This adaptation still yields delightful results.
Use Flavor Enhancers
For enhanced flavor, consider adding herbs, garlic powder, or cheese to the dough. These options will infuse the bread with rich tastes. You can also experiment with different types of flour, such as whole wheat or spelt, for deeper flavors and unique textures.
Be Patient During Rising
Patience is key when it comes to allowing your dough to rise. An overnight rise is ideal, but if you’re short on time, let the dough rise for at least 6 to 8 hours at room temperature. The longer rise helps develop gluten and enhances the flavor, giving you that crusty exterior and chewy interior.
Check for Doneness
Lastly, pay attention to the doneness of your bread. A well-baked loaf will have a deep golden-brown color. To check for doneness, tap the bottom of the loaf; if it sounds hollow, it’s ready to come out of the oven. Let the bread cool on a wire rack to maintain the crust’s crispness before slicing.
With these tips, you’ll achieve the perfect No Knead Artisan Bread every time!
Storage Tips for Best No Knead Artisan Bread Recipe:
Storing your freshly baked bread correctly can significantly enhance its flavor and texture. Follow these practical tips to maintain the freshness of your Best No Knead Artisan Bread Recipe.
Cool Completely Before Storing
Always let your bread cool completely on a wire rack. This process prevents moisture buildup inside the packaging. If you store warm bread, condensation forms, making your crust soggy and altering the texture of the loaf.
Use Paper Bags for Short-Term Storage
For short-term storage (up to two days), wrap your bread in a paper bag. The paper allows the bread to breathe while keeping the crust crisp. Avoid using plastic bags, as they trap moisture and can lead to mold growth, ruining your artisan bread experience.
Consider Bread Boxes
A bread box provides an optimal environment for storing your no knead artisan bread. It keeps moisture levels balanced while preventing the bread from drying out. Placing your loaf inside when completely cool ensures it remains fresh for a longer period.
Long-Term Storage in the Freezer
If you want to keep your artisan bread fresh for an extended time, consider freezing it. To do this, wrap the cooled loaf tightly in plastic wrap, then place it in a freezer-safe bag. This method protects against freezer burn. The bread will stay fresh for up to three months when frozen.
Thawing Frozen Bread
When ready to enjoy your frozen bread, remove it from the freezer and take off the plastic wrap. Let it thaw at room temperature for a few hours. For a crispy crust, pop the loaf in a preheated oven (at 350°F) for about 10-15 minutes. This step revives the texture and makes the crust crusty again.
Signs of Staleness and Mold
Keep an eye on your artisan bread for any signs of staleness or mold. If your bread feels hard or dry, try reviving it by toasting or using it in recipes like bread pudding. If you notice mold, it’s best to discard the loaf to ensure safety.
By following these storage tips, you will preserve the flavors and textures of your Best No Knead Artisan Bread Recipe, allowing you to enjoy its delightful taste for days to come.
Related Recipes to Enhance Your Bread Baking Skills
If you love the Best No Knead Artisan Bread Recipe, you will likely enjoy these delightful options. Each recipe complements the artisan bread experience, enhancing flavors and textures.
- Simple Focaccia Bread: This soft, olive oil-rich bread shares a wonderfully chewy texture similar to artisan bread. Focaccia is great for dipping in oils or enjoying with cheese. It requires little effort, perfect for beginners, just like the no-knead method.
- Homemade Pizza Dough: If you appreciate a good crust, try making pizza dough using a similar no-knead approach. This versatile dough is easy to prepare and lends itself well to various toppings, just as your artisan bread does. Pair a slice of artisan bread with a slice of homemade pizza for a delightful meal.
- Classic Country Bread: Rich in flavor and with a crusty exterior, country bread uses a straightforward method that involves fermentation. The depth of taste offers a rustic experience much like the artisan bread. Use it for toast or alongside soups for a hearty combination.
- Herb-Infused Olive Bread: Elevate your bread game with olive bread that incorporates herbs for added flavor. The no-knead technique works well to create a fragrant loaf perfect for sandwiches or as an appetizer. This complements the artisan bread’s simplicity while introducing exciting aromas.
By exploring these recipes, you can master different techniques while enjoying the unmatched satisfaction of homemade bread.
Frequently Asked Questions:
What is the main advantage of the best no knead artisan bread recipe?
The primary benefit of this no knead artisan bread recipe is its simplicity. It allows anyone, regardless of baking experience, to create a delicious loaf of bread without the laborious kneading process. The long fermentation time enhances flavor and texture, resulting in a crusty exterior and soft interior. This method breaks down gluten naturally, offering an artisanal touch even to novice bakers.
How long does it take to make no knead artisan bread?
While the actual hands-on time is minimal, the total process can take up to 18-24 hours, primarily due to the long rise period. This extended fermentation is what develops the complex flavors and improves the bread’s structure. Despite this lengthy timeline, you will spend only a few minutes actively preparing your dough.
Can I use whole wheat flour in the best no knead artisan bread recipe?
Absolutely! Whole wheat flour can be substituted in the artisan bread recipe; however, it may require adjustments in hydration. Whole wheat flour absorbs more water than all-purpose flour, so be prepared to increase the liquid content a bit. The result will provide a heartier, more nutritious loaf.
What kind of yeast should I use for no knead bread?
Both active dry yeast and instant yeast work well for this type of bread. Instant yeast is often preferred because it requires no proofing; you can mix it directly with the dry ingredients. However, if you only have active dry yeast, simply dissolve it in warm water before adding it to your mixture.
Do I need special equipment to bake no knead artisan bread?
While special tools can enhance the process, they are not necessary. A Dutch oven or heavy pot with a lid is ideal for creating steam while baking, contributing to that perfect crust. If you don’t have these, you can simply use a regular baking sheet, ensuring you create steam by placing a pan of hot water in the oven.
How should I store leftover no knead artisan bread?
To maintain its freshness, store your leftover bread in a paper bag at room temperature for up to three days. If you want to preserve it for a longer period, consider slicing the bread and wrapping it tightly in plastic before freezing. This way, you can enjoy homemade artisan bread for weeks to come.
Conclusion:
In conclusion, the Best No Knead Artisan Bread Recipe offers an effortless approach to baking delicious homemade bread. Its simplicity is one of its greatest assets, allowing anyone to create a crusty loaf without the need for extensive kneading. The long fermentation process not only enhances flavor but also provides flexibility in timing to suit your schedule. Additionally, this recipe encourages customization; feel free to add ingredients like herbs, nuts, or cheeses to tailor the bread to your personal taste. Whether you’re a novice or an experienced baker, this recipe will empower you to enjoy fresh, artisanal bread with minimal effort. Embrace the joy of baking and impress your family and friends with your newfound bread-making skills! Happy baking!